Showing posts with label DIY. Show all posts

Friday, March 1, 2013

St. Patrick's Day Birthday Party

My daughter was born on St. Patrick's Day.  Her first birthday was before there was Pinterest to get ideas, but that didn't mean there weren't ideas on the internet.  Basically I did  a lot of research and finally found Amy Atlas (she is who I want to be when I grow up), which was my inspiration and first attempt ever at party decorating, so don't judge it too hard.

The main area was mainly green since it was St. Patrick's Day with a hint of pink for my little girl.
The scrolls on the left are a table cloth cut up and surged on the edges and then mongrammed (one for each child invited).  These were intended to be used as functional party favors.  They are reusableo on the table mats for toddlers eating finger foods.
The clover lollipops were all made with molds. The hat was made on by my mom on her embroidery machine.  
These are three wrapped Styrofoam cake forms used to display cupcakes with character. 
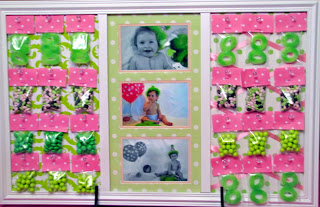
This was a framed bulletin board. The candy favors are in mini plastic storage bags and then stapled shut with scrapbook paper..  They were then pinned on the cork board with clear push pins.

These were cupcakes with my little girl's face on them.  They didn't come out great, but what can I say, it was our first try.

This was the pink table filled with: pink cupcakes, pink and green cookies, pink large mylar balloons, and pink clover lollipops. 

I also made the cake and the inside was pink strawberry cake.

 This party was simply a first attempt and was a lot of fun.  The green was because she was born on St. Patrick's Day (and this was likely the only year she would let me get away with it) and the pink was to celebrate the precious little girl. I hope you enjoyed seeing one of our first every parties.  

Friday, December 14, 2012

DIY: "Idea" Gift


Today I am on the way to Houston to celebrate a great woman's life and to welcome a new little one into the world. I am car crafting on the way. I have a couple writers in my life that I am making this gift for but it can be a fun gift for anyone who likes ideas of fun things to do or date ideas. Here is how to make your idea gift.

Thursday, December 6, 2012

DIY: Dog Bed Tutorial/Re-purposed Dog-Destroyed Throw Blanket


Here is an easy tutorial for creating a no-sew pet bed from a throw blanket. Anyone can do those- even your kiddos. It is also a great way to re-purpose your pet's favorite blanket....or your favorite blanket that your dog may have damaged. This tutorial is also unique because you can make the dog bed have its own attached blanket easily.

Monday, December 3, 2012

Advent Calendar


I have a friend that I swear should be an interior decorator.  This was her craft so I don't have many pictures, but she gave me permission to share her idea with you.

First, she went to Hobby Lobby and bought a frame that did not come with glass.  She was planning to paint a frame, but this rustic look was perfect for her vision.  Then she chose a variety of different designs, such as miniature clothes pins, stockings, large cute gift tags, and she added some kid socks for character.  Next, she cut chicken wire and stapled it on the back of the frame.  Finally, she hung up the various Christmas stockings and tags after writing an activity for her children to complete each day.  Such a simple, but cute idea.  Thank you Natalie for allowing me to share your creation! I can't wait to make one for my house!

Stay tuned for Advent Calendar activity ideas....


Sunday, December 2, 2012

DIY: Leaf Flower Tutorial


I don't know about you but I always end up with lots of extra leaves when I am crafting. I always think, "What a waste." Well today I decided to put those extra scraps to good use. Here is my tutorial on how to make flowers from your extra floral scraps. 


Take all of your leaves and push them off the ends of the wires. 


Now you have so many "petals" to work with. 


Gather your supplies. I used beading wire and a piece of rhinestone ribbon to make my center embellishment. You could use string and you could hot glue anything into the center of your flower.


Simply bead your first leaf on. Take the rest of the green plastic stem pieces off so that the petals can lay flat.


 Once you have all the leaves you want for your flower strung, twist the wire to the back and knot it. Re-fluff your leaves and add something to the center and you are done! If you want to use rhinestone ribbon or bead something into your center follow the next step.


Move your wire knot back to the front. String the beading wire through the ends of the ribbon. When you tie it tight it will form a loop in the center. Snip the ends of the wire you are finished.


You can use these flowers on anything. I chose to use mine on a wreath that I am making. You could also spray paint them another color. I hope this inspires you in your crafting!

This Link was Shared Kindly at:
Skip To My Lou


Saturday, December 1, 2012

Tutorial: DIY Cheap Christmas Berry Ornaments


I have really been in the Christmas spirit lately! My husband and I put up our beautiful new frosted tree  up but there was one problem. All of our ornaments were still in storage in Texas. I decided to give myself a very tiny budget for new ornaments this year and that meant making my money stretch. I hit the dollar store and ended up creating some beautiful, natural ornaments for my new tree! Here is how you can make them too. 

Thursday, November 29, 2012

DIY Personalized Dry Erase Memo Board


I told you I know a lot of people with birthdays this season. I made this gift for under $3.00!

I like to give my gifts like this with a wet erase marker instead of a dry erase marker so that when you add to your list you don't smudge off what you wrote before.

So here is how I made it:  I picked up a frame from the dollar store. I used the stock picture in the frame as a guide to cut a piece of scrapbook paper to size for the frame. To make my personalized "K loves E" I chose a leftover paint swatch from my previous project and twisted aluminum wire with my $8 Walmart jewelry tools. I secured my shapes onto the swatch with pieces of a glue dot and rounded the corners with a punch. I glued my self made embellishment to the paper and set it inside the frame. To make my cute little clothespin for reminders and my decorated pen I simply wrapped them both in washi tape bought from Michael's.  (Michael's finalllly has an aisle for washi tape! I wish Hobby Lobby did too!) I secured it to the top of the frame and voila! A completely personalized gift was made for under $3.


Monday, November 26, 2012

DIY Tutorial: Framed Embroidery Art Pieces


My extended Thanksgiving weekend was filled with lots of fun times with family. I ended up seeing two movies, playing two new board games, watching too much football, eating too much, watching two puppies play continuously, and making too many crafts with my mom. If anyone was wondering, my husband's grandmother did like her fancy dry erase calendar and the colors I chose matched her decor perfectly! I hope it will help her stay oriented as well. Whew! 

My mom rents a booth at Peddlers Market Place (1601 Sampson St. Westlake,  LA  70669-4013) so we decided to make some things for her to sell at her booth. I'm hoping she will make an Etsy store soon because she is so talented. We broke in her new embroidery machine and broke out the hot glue gun.So, together we made little art pieces! Keep reading to see how you can make cute art or DIY gifts too!

Sunday, November 18, 2012

Tutorital: DIY Fancy Dry Erase Calendar

In my family we have tons of birthdays to celebrate in the fall and winter seasons. Those along with Christmas means that there are lots of presents that need to be purchased or made. This year I am trying to make as many as possible. I plan to share some with you as they are completed.

Sunday, November 11, 2012

Blog to Book


Oh how I love to blog.  Every time I hear a friend is pregnant (especially if it's their first baby) I always encourage them to make a blog. The greatest benefit of making a blog about your pregnancy and the life of your child is that all of your family members have the same access to the story of you and your baby's development.  I love when a family member calls me and tells me I read your blog and I can't believe (and describes the event). 


Saturday, November 10, 2012

Envelope System with Printable Envelopes

If you are reading this you are either using an envelope system for budgeting or are interesting in getting your money under control, either way congratulations! My husband and I have been working to become debt free since we found out I was pregnant with my daughter (3 1/2 years ago). We are very close to debt free too. We still have a mortgage on our home and some student loans to pay off. I am only telling you this because I want you to know I am a veteran and I have lived this religiously for the entire three and a half years. It is not always easy to live on a budget but something about it is freeing. I literally feel lighter, I no longer have anxiety attacks, and I am an all around happy person. Other areas of my life have fallen into place since getting money under control: my marriage is happier (which was only possible by the birth of my sweet baby girl), my house is cleaner, I work less, I cook better, and my bank account is fatter!

The "b" word (budget) doesn't have to be a bad word.

Wednesday, November 7, 2012

DIY Branches Frame

For Mother's Day, I cheated and looked at my Mom's Pinterest account to get an idea of what to get her this year.  Money wasn't really a concern, we always budget for gifts, but I didn't want to buy just anything, I wanted to buy something she truly would enjoy.  Lately she has been focused on buying things for the lake house they just bought and are renovating.  My mom has a theme throughout her lake house of trees, which I must say fits in well with the location of the lake house.  One pin she had inspired this craft, which was fun to make with the help of my sweet sweet hubby.

Tuesday, November 6, 2012

Food Tracker Book Printables & Tutorial

I am finally getting back to focusing on my health. For me, that means sticking to a low carbohydrate diet and tracking with I eat and drink so that I can work toward getting to a healthy weight. I came up with this food tracker book to help me keep track of what I eat and drink and to increase my motivation and accountability to myself.   Now you can make your own with these printables and this tutorial!

Friday, October 26, 2012

Recycling Broken Crayons

I hate being wasteful and as a child I remember loving rainbow crayons. The mystery of what colors would appear excited me for some reason.  So I gathered all of our melted (from being in the car) and broken crayons and peeled the paper off of them.


Wednesday, October 24, 2012

$5 (Or Less) Personalized Apron

If you know children like the ones I know, you probably know a lot of miniature chefs.  In an hour or less you can make an apron that is personalized and costs only $5!  I bought the children's apron at Hobby Lobby with my 40% off coupon costing me about $3 and the transfer paper at Target costs about 50 cents a sheet.  The example below was for a little boy who loves to barbeque with his daddy.  We are planning to make his dad a matching one for Christmas!


First, buy photo transfer paper that will work with the type of printer you have.  Then design your art.

Monday, October 22, 2012

How to Make a Personalized Card Box for your 52 Resons


Whether you are making a gift for a 52nd birthday, for your honey, or just because, this gift idea is one that I think everyone should try. What could be more thoughtful? 

Now, we have all seen this craft but no one has talked about how to create a personalized card box for your very thoughtful gift. Here is what you do.

Monday, October 15, 2012

Beautiful Birthday Candles


Have you ever noticed that the candles you buy in the grocery store are never visually appealing and half of the time the numbers don't even match?  As a Type A person this drives me crazy so I found a solution for this issue that is a quick fix.

First buy some cheap candles and acrylic paint of your color choice

Sunday, October 14, 2012

52+Deck of Cards= Awesome 52nd Birthday!


Have you ever wanted to throw a very thoughtful birthday, but been on a tight budget?  This theme would work great for any birthday, but it's beyond perfect for celebrating a 52nd birthday (since it's a deck of 52 cards)! Over the next few days we will show you how to make each of the projects for the party. The total for the party decorations and the cake (with personalized candles) was less than $20!


Tuesday, October 2, 2012

A Free Thoughtful Fun Gift in an Hour or Less


Do you have family spread all of the world and want to make someone you love feel like everyone is united in celebrating a special occasion?  Well, this was my predicament a few weeks ago when my father-in-law was in the hospital on his birthday and all of his children were in different cities or states so there was no possible way we could all be there to celebrate with him (not to mention he needed to rest and recover from surgery).  I thought for days to figure out a way to make him smile through his pain and feel overwhelmingly loved even if it was only for a few moments on the day of his birthday.  I had a eureka moment when the light bulb flickered on and I decided to make a short montage video with up beat music of the entire family doing silly things to make him smile. 

Here is a FREE way to give a very awesome loving and thoughtful gift. It will look like it took hours to create when in reality it will take you less than an hour. Simply have all of your family record short low quality videos and/or have everyone take cute pictures with a message or holding a balloon or something else and then save them all in a folder together for easy access.

Related Posts Plugin for WordPress, Blogger...